Basic Information
About the Repositories
There are two CARMA repositories in GitHub:
- CARMA_base https://github.com/ESCOMP/CARMA_base
This is the repository, or repo, for the CARMA model core source code, used in CESM, specifically in CAM or WACCM.
Changes to the main code are pushed to this repo which presently has one main (default) branch and, and may, at times, include other experimental branches.
- CARMA stand-alone https://github.com/ESCOMP/CARMA/
This is the repository for the stand-alone regression tests of the CARMA model core source code, and the self-generated HTML documentation. It has a single default branch, main, and points to the CARMA_base repo for the source code in the source/base directory.
For more information on the CARMA stand-alone regression tests see:
- The README on the CARMA stand-alone Github page
- How to run stand-alone CARMA regressions test on the CARMA wiki
Getting Help on Git
The Linux man page for Git presents detailed information about Git. To invoke, type:
man git
or
git help git
You can access an abbreviated Git help which lists common Git commands by typing:
git help
The following three commands will return detailed, Linux man page-type help on any Git command, as well as available options to the command:
git <command> --help,
git help <command>
or
man git <command>
A tutorial introduction to Git can be accessed by typing the following at the command line:
git help tutorial
Some Basic Git Commands
Some basic Git commands and a few options in no particular order:
git status-v: verbosegit branch- list , create, or delete branches in your clone-a: list both local and remote tracking branches-d: delete branch named-v: verbose-vv: verbose + print the name of the upstream branch, as wellgit remote- manage the set of remote repositories that you track-v: verbose, show URL of remote after name
git checkout- switch to another branch or restore working tree files
git add- add (stage) a file or files to your next commit; new files must be staged in order for Git to know about and track them.-v: verbose
git commit-a: stage all tracked files that have been modified or deleted-m: “<msg>”: use the given <msg> as the commit message
git push- send commits in your local branch to the remote repository-v: verbose
git fetch- download (fetch) branches and tags from the Git remote repository-v: verbosegit merge- merge the fetched branch(es) into your current branch
git reset- reset the index and the working directory to the last git commit’s state
git restore- restore modified but not yet committed files in your working tree to last commit; changes are discarded (Note: new, experimental command)
git diff- show changes between commits, commit and working tree, etc.
git rm- remove files from the index and working directory-r: allow recursive removal when a leading directory name is given
Some Online Git References
Some online references on the basics of using Git:
- The ESCOMP/CAM wiki Git and Github page
Provides links to Git tutorials and references, and information about setting up your Git environment. This wiki is written specifically for the CAM Github repository,
but the instructions can be generalized to other repositories.
“[M]eant to be a quick reference for learning and remembering the most important and commonly used Git commands”
“[F]eatures the most important and commonly used Git commands for easy reference.”
Lists basic Git commands with basic information on each and examples on their use.
Making and Saving Revisions to the CARMA GitHub Repositories
If you plan to submit new code or code modifications to the CARMA or CARMA_base repositories, and you don't already have a fork of the repository
you wish to modify, you will need to make one. Please note that you can have only a single fork of any one remote repository at a time.
Modifications should never made in the CARMA Github repositories, nor in your remote fork. Instead, you will need to clone a local copy of your remote
repository fork in an account on a Linux machine such as cheyenne. Modifications will be made in your clone (your local repository), then pushed up to
your fork.
Following are the steps to make a fork of a remote repository such as the CARMA_base or CARMA stand-alone, then create a local clone of your fork in
which to make and test modifications to the code.
Make a Fork
To make a fork of a remote repository:
- Go to the online (remote) repository you wish to fork on GitHub and click the Fork “button” in the upper right corner of the page:

You will be asked where to make the fork; select your GitHub account if more than one choice is offered. Your new fork will include all the branches that are
part of the parent repository.
Create a Clone
You will need to clone your fork to create a local copy of the repository on your Linux account; it is this local clone (local repo) where you will
make and test your changes.
- You will create a clone of your fork in your account on cheyenne or casper where you will do your development work. To clone a fork of the
CARMA GitHub repository we made, log on to your Linux account; on the command line type:
git clone --recursive https://github.com/<userid>/CARMA.git <clone name>
where <userid> is your GitHub user ID and <clone name> is the name you wish to give your clone as well as the name of the directory into which
your fork is cloned. Note that <clone name> is optional, but if you do not provide a name, your clone and directory will be named CARMA.
- Connect your local repository, the clone you just created, to the remote CARMA repo:
cd <clone>
git remote add ESCOMP https://github.com/ESCOMP/CARMA.git
- Download the existing remote GitHub repository to your local repo:
git fetch ESCOMP
Create a New Branch in Your Clone
- Create a branch in your clone and set it to track the remote branch main from the remote ESCOMP repository:
git branch <branch> ESCOMP/main
Where <branch> is the name you give your new branch. The second argument, ESCOMP/main is where on the repository “tree” your branch begins.
- Switch to your new branch:
git checkout <branch>
You’re now ready to make modifications in your branch on your local repository.
Modifying the Files in Your Clone
Make modifications and/or additions to the files in your clone, save and test your changes. Repeat this process until you’re satisfied with the changes you’ve
made. You’re now ready to stage and commit the changes to your repository. When your modifications have been committed to your clone you can push them
up to your fork.
Save Your Changes to Your Local Repository
Saving your changes to your local repository involves three steps:
- Check the status of your repository:
git status
An example of output from a git status command:
On branch kappa_dev
Your branch is up to date with 'myCARMAfork/kappa_dev'.
Changes not staged for commit:
(use "git add <file>..." to update what will be committed)
(use "git restore <file>..." to discard changes in working directory)
modified: source/base (new commits)
Untracked files:
(use "git add <file>..." to include in what will be committed)
build/
doc/f90doc/
run/
tests/bench/carma_kappawetrtest.txt
no changes added to commit (use "git add" and/or "git commit -a")
In this example you can see that the new file carma_kappawetrtest.txt in directory tests/bench/ is not yet tracked.
Note that directories build/, doc/f90doc/ and run/are also untracked, but these don't belong in the CARMA stand-alone
repository so they should not be staged (added) or committed to your clone.
- Stage your new changes to be committed:
git add <new_file(s)>
Using the information in the “git status” example above you would type
git add tests/bench/carma_kappawetrtest.txt
to stage the new file.
If you have more than one file to add you can type the file names sequentially on the same line; e.g.,
git add <new_file1> <new_file2> <new_file3> ...
Or you can add each one individually:
git add <new_file1>
git add <new_file2>
git add <new_file3>
etc, ...
If you want to stage everything you can do the following:
git add *
But be careful with this command: be sure that you want all of the files you’re about to add to be pushed to the remote repository.
In the example above you would find that you’ve added all of the files in the directories build/, doc/f90doc/ and run/.
- Commit your changes:
git commit -m “<description of changes/reason for commit>”
where <description of changes/reason for commit> is a short commit message describing all the changes in this commit.
To enter a longer message, omit the m and the “<description of changes/reason for commit>”:
git commit
Depending on how you’ve set up your Git environment, an editor window should open that allows you to enter a longer, more
detailed message than is possible using the first version above.
Another option that allows you to write a longer message, as well as to edit you message, is to create a text file <filename> in which
you put your commit comments, then use the -F option:
git commit -F <filename>
Your changes have now been committed to your local repository; you are almost ready to push those changes up to your remote fork.
Before pushing your changes back to your fork you will need to bring your local repository up-to-date with the remote upstream repository.
Bringing Your Local Branch Up-to-date with the Remote Repository
If you will be updating your local branch frequently or working in this or other branches from your fork in the future adding a "shortcut" remote
for the CARMA repository may be advisable.
To add a remote called upstream to the CARMA repository, type:
git remote add upstream https://github.com/ESCOMP/CARMA
Now, rather than typing out
git fetch https://github.com/ESCOMP/CARMA
all that is needed for the git fetch command is:
git fetch upstream
- Before merging in the changes from the repository, make sure you’re on the correct branch in your local repository:
git checkout <your branch>
- And, finally, tell Git to look in the contents of your local copy and merge it with the contents of CARMA_base:
git merge ESCOMP/CARMA_base
Your working branch in your local repository is now up-to-date with the upstream remote repository.
Push Your Changes to Your Fork
To move your local changes up to the remote repository you will push them:
- To push your changes to your fork; type:
git push <origin> <branch>
where <branch> is the name you gave your branch and <origin> is the name of the source repository; here, your personal fork.
The default name is ‘origin’, so, if you have not renamed it, you can type
git push origin <branch>
You will be asked for your GitHub userid and password.
- If you don’t remember the name you gave your branch, before you issue the push command, type
git branch
You should see output similar to this:
* new_feature
master
The branch you are working in is denoted by the asterisk. In this example, the branch in use is new_feature.
- If you want to push your entire (new) branch from your local repository up to your fork to create a new branch in your fork which
mirrors the original, add the-u
git push -u <origin> <branch>
For example,
git push -u <origin> new_feature
This will create a new branch in your fork named new_feature identical to the branch of the same name in your local repo. The -u option
will “add upstream (tracking) reference…” (from git push –help.)
Note: You will be asked for your GitHub user ID when you issue the git push command.
Open a Pull Request (PR)
You must get approval for the changes you’ve pushed to your fork before they can be merged into the CARMA code. To do this, you will need
to open a pull request or PR.
- In your fork on GitHub, click on the branches link to check that your changes have been uploaded to your CARMA fork:

- If you are on a branch of your fork, back out (using your browser's Back arrow)so that you see a list of your branches.
To initiate a new Pull Request (PR), click the “New pull request” button to the right of the branch you want to select:

- You'll get an "Open a pull request" page similar to the one below. If you see "Able to merge" above the title space your PR can be merged into the remote
repository without having to reconcile any conflicts.

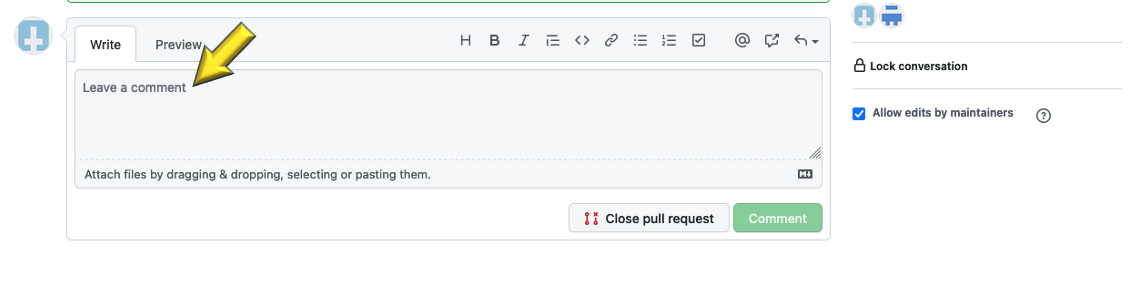
Give your PR a title and write a short comment explaining the purpose of this pull request.
Click on the “gear”to the right of "Reviewers" in the upper right hand corner to select reviewers for your PR.
After you enter a title, the Create pull request button will become active; click it to create your pull request.
Or you may click on the pull down arrow on the right end of the button and choose Create draft pull request.
- At the bottom of your new pull request page is a space for your reviewers to leave comments about your pull request. The comments may include suggestions and
requests for changes.
- Near the bottom of your pull request page and above the space for new reviewer comments is a panel similar to this one summarizing how many changes
have been requested by your reviewers. These requests must be addressed before the PR can be approved.

The icon  in the upper left hand corner of the panel will turn green
  when all requested changes have been made and your pull request approved.
- Once your pull request has been approved you can click the Merge pull request button to merge your changes into the CARMA stand-alone or the CARMA base
Github repository.
