Introduction
Why use version control?
"I have always just made my changes using SourceMods, and it has worked fine for me. Why should I start using subversion?"
SourceMods work well when you have a small set of changes that you just need to apply to a single case, or even a few cases that are all based off of the same code base. But when you start to have larger changes (e.g., changes that take more than a few hours to develop), or you have a longer-term development that you want to keep up-to-date with changes on the CLM trunk (and maybe even eventually merge back onto the trunk!), then version control can make your life considerably easier.
We could write a whole document on the reasons to use version control, but we'll spare you and just list two good reasons:
- Subversion is like a giant UNDO button. Subversion allows you to easily review your recent changes, and undo any that you decide aren't appropriate, aren't working, etc. If you're disciplined about committing frequently, then you can even undo any set of changes that have been made, any time in the past. Before using version control, I would keep lots of spare copies around, with names like "myfile.F90.old", "myfile.F90.old2", "myfile.F90.I_think_this_works", "myfile.F90.replaced_2013-10-22", etc. Subversion automatically handles this for you, in a much more manageable way.
- Subversion facilitates collaborative development. If you have ever tried to manually update your changes to a more recent CLM version, you have probably thought, "There must be a better way." There is. Subversion will merge your changes with changes made by others. As long as you haven't modified the same lines of code, this process can be quite easy.
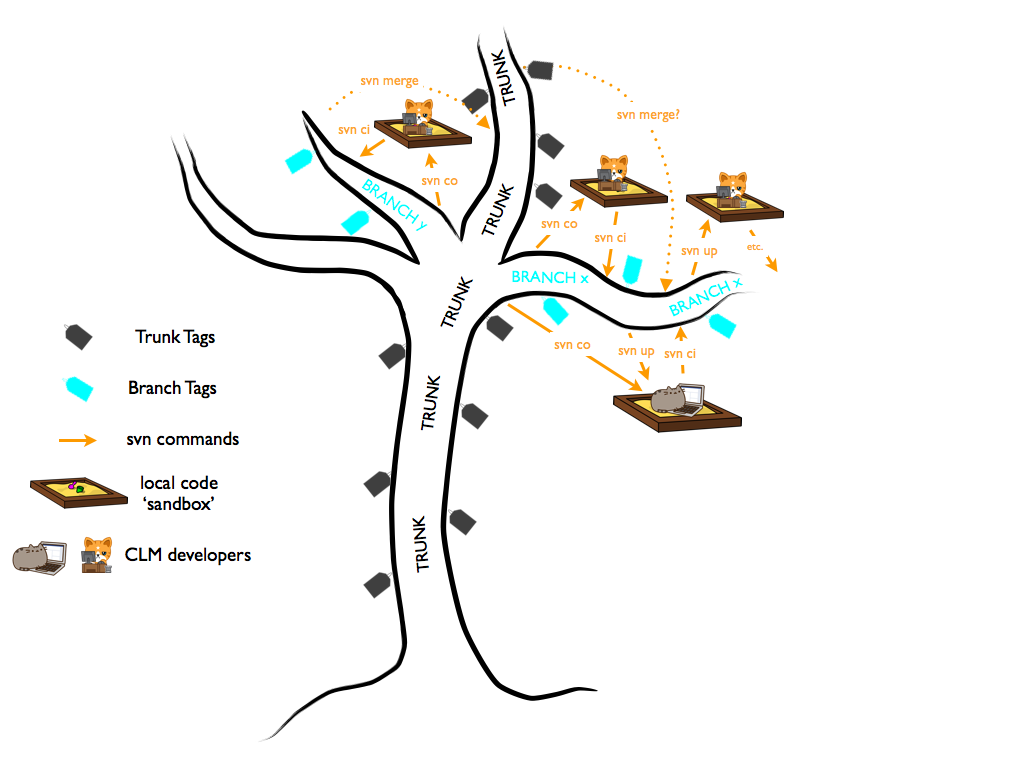
What is a trunk / branch / tag / sandbox?
CLM follows the subversion terminology for trunk and branches (see http://svnbook.red-bean.com/en/1.7/svn.branchmerge.whatis.html). Specifically, we have:
Trunk: The main line of development of CLM, and the version that will go into public releases. Only code that has been well-tested can go onto the trunk. Only the CLM Code Management Team may commit code to the trunk.
Trunk tag: A meaningful name for a particular version of code on the trunk. (See also http://svnbook.red-bean.com/en/1.7/svn.branchmerge.tags.html). A trunk tag will correspond exactly to a version on the trunk, but it's easier to remember "clm4_5_36" instead of "Revision 54015 on the trunk". Our typical practice is to tag every change that is made to the trunk.
Branch: A separate line of development, often used for developing new features that may or may not eventually be brought to the trunk. Typically a branch will start as a copy of the trunk, and then will diverge. The advantage of doing this via a branch in subversion is that subversion allows you to keep track of the changes made to your branch, and facilitates keeping your branch up-to-date with changes made to the trunk. Any change made on your branch will affect only your branch – you do not need to worry about interfering with anyone else's development.
Branch tag: Similar to a trunk tag, this simply gives a meaningful name to a particular snapshot of your branch. If you follow our suggested naming convention (described below) you will have an easier time keeping your branch up-to-date with the CLM trunk.
Sandbox: A local checkout of a version of the code, where you do your work.
CLM trunk, branches, tags and sandboxes (image designed by Rosie Fisher)
What is the CESM branch tag naming convention?
While you are not required to follow this naming convention, we strongly encourage it. It will help you keep your branch up-to-date with the CLM trunk, and will facilitate bringing your branch back onto to the trunk eventually.
A typical CESM branch tag looks like this:
This is a tag for the branch:
https://svn-ccsm-models.cgd.ucar.edu/clm2/branches/dynlu_allocate_memory
Take a look at the actual tag name:
dynlu_allocate_memory_n02_clm4_5_18
There are three components to this name:
• dynlu_allocate_memory: This is the same as the name of the branch
• n02: Each time you tag some changes that you have made to your branch, you will increment this number
• clm4_5_18: This indicates the CLM trunk tag that the branch is up to date with. Whenever you update your branch to a more recent trunk tag (as described below), you will make a new branch tag where you have updated this part of the tag name. (Occasionally, you may want to branch off of another branch, or update your branch to pull in the changes in another branch. In this case, this component of the tag name will be the BRANCH tag that you are up-to-date with, instead of the trunk tag.)
Tagging recommendation
We strongly recommend that each tag contains EITHER updates that you have made (in which case you will increment the branch tag number) OR an update to the baseline tag (by merging in the latest trunk changes, in which case you will increment the baseline tag portion of the tag name) – NOT BOTH. Following this suggestion will help considerably in understanding the changes that have been made to your branch, and especially if you ever have to undo a change.
Here is an example sequence of tags for the branch dynlu_allocate_memory:
dynlu_allocate_memory_n00_clm4_5_15 - This is the initial tag; it is identical to clm4_5_15
dynlu_allocate_memory_n00_clm4_5_17 - No changes have been made on the branch yet, but it has been updated to clm4_5_17 (pulling in changes made in both clm4_5_16 and clm4_5_17) - so this is identical to clm4_5_17
dynlu_allocate_memory_n01_clm4_5_17 - The first set of changes were made on the branch
dynlu_allocate_memory_n01_clm4_5_18 - No more changes were made on the branch, but it was updated to clm4_5_18
dynlu_allocate_memory_n02_clm4_5_18 - The second set of changes were made on the branch
Two methods documented here
We document two methods for creating branches and tags.
The standard method uses built-in svn commands. This method will work on any machine with svn.
We also document an alternate method, which uses some wrapper scripts that we have written. This method requires a bit of additional setup on your part, but it makes the branch and tag creation process simpler and less error-prone.
The results of both methods will be the same, so you can use whichever method you prefer. In general, we recommend that, if you are new to svn, you start by using the standard method, using only svn commands. Then, if you find yourself making more than a couple of branches or tags, you may want to start using the wrapper scripts to make this process easier.
Conventions used in this document
In the command snippets that follow, we use angle brackets '<' and '>' to demarcate text that you should replace.
For example, if you see an instruction like this:
svn co https://svn-ccsm-models.cgd.ucar.edu/clm2/branches/<branchname> ./clm_<branchname>
Then you should replace the two instances of <branchname> with your actual branch name. For example, if your branch name is "fix_lots_of_bugs", you would execute the above command as:
# EXAMPLE
svn co https://svn-ccsm-models.cgd.ucar.edu/clm2/branches/fix_lots_of_bugs ./clm_fix_lots_of_bugs
Note that examples will begin with a comment line like "# EXAMPLE", to clearly separate examples from general commands that you should copy.
Also, throughout the document, we call out some text in a variety of ways:
Helpful information
Helpful side-notes will be given like this
Important note
Really important notes will be given like this. Failure to pay attention to these will likely result in your having a Very Bad Day. (Luckily there aren't too many of these.)
Alternative method
Pointers to the alternative method will be given like this.
Where to get more help with subversion
For more details on how to use subversion, we recommend the very good, free book, http://svnbook.red-bean.com/. If you are new to subversion, we especially recommend that you read Chapters 1 & 2 in that book. In addition, Chapter 4 covers branching and merging in more depth; while we generally recommend following the merge procedure documented on this wiki page, you can see other ways to use merging from that book.
Subversion also has a good built-in help system. You can obtain help on any command; for example, to learn more about 'svn status', type the following:
svn help status
Step 1. Create your branch and branch tags areas
Note: If you would prefer to have the CLM Code Management Team do this step for you, you may email CLM-CMT@cgd.ucar.edu with your request for a new branch.
You will need to decide on:
- A branch name that describes the purpose of your branch
- A starting (baseline) tag for your branch.
- Usually this will be the latest CLM trunk tag
- However, in some cases, you may want to branch off of an older trunk tag, or another branch tag. The procedure is the same in those cases; you will simply point to the appropriate tag in the "svn cp" command. Note that the instructions here are written assuming you are branching off of the trunk; if you are branching off of another branch, you will need to replace references to trunk tags with references to tags on the baseline branch in the below instructions.
- If you have already implemented your changes off a particular trunk tag, you should either
- Use that tag as the baseline, follow the instructions here, and then update it to the latest trunk tag, or
- Use the latest trunk tag as a baseline for your branch, and reimplement your changes manually there
- Note that you MUST branch off of a tag (trunk tag or branch tag) – you cannot branch off of a branch that does not have an associated tag. (Our branch tag naming convention relies on this.)
Create your branch and branch tags areas with the following commands:
svn cp https://svn-ccsm-models.cgd.ucar.edu/clm2/trunk_tags/<clm_baseline_tag> https://svn-ccsm-models.cgd.ucar.edu/clm2/branches/<branchname> -m "<message describing the purpose of your branch>"

svn mkdir https://svn-ccsm-models.cgd.ucar.edu/clm2/branch_tags/<branchname>_tags -m "creating branch tags area"

svn cp https://svn-ccsm-models.cgd.ucar.edu/clm2/branches/<branchname> https://svn-ccsm-models.cgd.ucar.edu/clm2/branch_tags/<branchname>_tags/<branchname>_n00_<clm_baseline_tag> -m "creating baseline tag"
For example, if your branch name is "fix_lots_of_bugs", and you are branching off of the clm4_5_36 trunk tag, you would execute the following commands:
# EXAMPLE

svn cp https://svn-ccsm-models.cgd.ucar.edu/clm2/trunk_tags/clm4_5_36 https://svn-ccsm-models.cgd.ucar.edu/clm2/branches/fix_lots_of_bugs -m "branch for fixing lots of bugs"

svn mkdir https://svn-ccsm-models.cgd.ucar.edu/clm2/branch_tags/fix_lots_of_bugs_tags -m "creating branch tags area"

svn cp https://svn-ccsm-models.cgd.ucar.edu/clm2/branches/fix_lots_of_bugs https://svn-ccsm-models.cgd.ucar.edu/clm2/branch_tags/fix_lots_of_bugs_tags/fix_lots_of_bugs_n00_clm4_5_36 -m "creating baseline tag"
Alternative method
This step is considerably simpler using the wrapper scripts - see the description of the alternate method for details.
Step 2. Check out your branch
Create a sandbox for your code modifications by checking out your branch (the area on disk it creates is called a sandbox).
svn co https://svn-ccsm-models.cgd.ucar.edu/clm2/branches/<branchname> ./clm_<branchname>
Step 3. Copy source modifications into your svn sandbox
Copy your changes into the source files in your svn sandbox. If you had set up a case with source changes in it (in SourceMods/src.clm) you need to overwrite the original source files in your svn sandbox with your SourceMods. When working on a branch, you should keep track of your source code in the svn sandbox rather than in SourceMods.
Of course, if you haven't yet made any changes, then you will skip this step, and instead start making changes directly in your sandbox.
Step 4. Commit changes to your branch in the svn repository.
First review your changes using status and diff sub-commands:
svn status

svn diff
'svn status' will show you what files have been modified. You may see quite a few files with a '?' next to them; this is generally fine - it just indicates files that subversion doesn't know about. For example, this includes any cases that you have created in your scripts directory. However, see the note below about adding files if there are any new files that you want to check in to subversion.
'svn diff' will show you the changes you have made since your last commit, with additions marked with '+' and deletions with '-'.
Adding and deleting files
If you have added any new files (e.g., a new .F90 file), you need to tell subversion about this file. You do this with the command 'svn add <filename>' after you have created the given file in your sandbox. Then, when you run 'svn status', you should see an 'A' next to the file that you have added.
Similarly, if you are removing a file, you need to do this with 'svn rm <filename>'; you should use this command instead of simply doing 'rm <filename>'. Then, when you run 'svn status', you should see a 'D' next to the file that you have removed.
Then you can commit your changes to your branch using the commit sub-command:
svn commit -m "<message describing the changes you are committing, and the reason for these changes>"
It is easier to write a long commit message in a text editor. If you want to do this, first create a text file in your current directory that contains your log message. Then use the -F option instead of the -m option to 'svn commit', giving it the name of the file containing your log message:
svn commit -F <logmsg_filename>
If you are collaborating with others on this development, you may want to include a more detailed log message. See the ChangeLog file in the top-level directory for examples of what you may want to include in this case.
Where to run these commands
The above svn commands operate on the current directory and everything under it. Thus, unless your changes are restricted to a single sub-directory, you will typically want to execute these commands from your top-level directory (containing models, scripts, etc.), or from within models/lnd/clm (the latter will give less clutter, and is a fine choice as long as you haven't modified any externals - see the next bullet point)
Note about modifying other components
CLM proper just consists of the files in components/clm. You can make changes to other components (e.g., cime, cism, rtm) in your sandbox, and those changes will take effect for any case that you create from that sandbox. However, changes to those other components will not be committed to the subversion repository with the above method. Thus, if you or someone else checks out another copy of your branch, the changes to these other components will need to be reintroduced in the new sandbox.
For simple changes, you may find it easiest just to leave these changes to external components uncommitted in your sandbox. For more complex changes, you can create a branch of the appropriate component using a method similar to the one described here (although note that cime is in a git repository rather than a svn repository). You then need to point your CLM branch to this new branch using the SVN_EXTERNALS_FILE and the svn:externals property; however, be aware that this can create conflicts in the externals property when merging in more recent CLM trunk tags, so we recommend that you only do this if you are comfortable working with svn.
Step 5. Tag changes
Tagging is simply giving a memorable name to a particular version of changes. You can tag your changes with every commit, or after a group of commits. However, at a bare minimum, you should make a tag:
- Before updating to a newer trunk tag (see below)
- Before handing off your code to the CLM Code Management Team
You can see your existing branch tags with:
svn ls https://svn-ccsm-models.cgd.ucar.edu/clm2/branch_tags/<branchname>_tags
A typical branch tag name will look like:
branchname_n08_clm4_5_36
The n08 in this name indicates that this is the 8th set of changes that have been tagged, and clm4_5_36 indicates that the branch is up to date with the clm4_5_36 trunk tag.
In the above example, you would name your new branch tag:
branchname_n09_clm4_5_36
You can make a new tag with:
svn cp https://svn-ccsm-models.cgd.ucar.edu/clm2/branches/<branchname> https://svn-ccsm-models.cgd.ucar.edu/clm2/branch_tags/<branchname>_tags/<branchname>_n<XX>_<clm_baseline_tag> -m "<description of the changes in this tag>"
Following the above example, for a branch named fix_lots_of_bugs you would run:
# EXAMPLE
svn cp https://svn-ccsm-models.cgd.ucar.edu/clm2/branches/fix_lots_of_bugs https://svn-ccsm-models.cgd.ucar.edu/clm2/branch_tags/fix_lots_of_bugs_tags/fix_lots_of_bugs_n09_clm4_5_36 -m "<description of the changes in this tag>"
Typically, a given tag will either include changes that you have made (in which case you will increment the XX portion of the tag name), OR update the baseline version (see below), but not both.
Alternative method
Our wrapper scripts make this step simpler and less error-prone - see the description of the alternate method for details.
Step 6. Update your branch to a later trunk version
Periodically, you will want to update your branch to newer versions on the trunk. This is useful if you want to get changes that went on the trunk (for a bug-fix for example), or just to stay up to date to make updating easier. If you update less frequently the changes will be bigger and the chances for conflicts are higher. This makes the merge process more difficult. If you constantly update you will spend a lot of energy just keeping up to date rather than being productive. As a compromise, we suggest updating to the latest trunk tag on a monthly kind of time-frame.
First, it is very important that you do the following:
- Make sure you don't have any uncommitted changes: use 'svn status' to check this, and commit any uncommitted changes, as described above
- Make sure you are in the top-level directory of your CLM sandbox – the directory containing 'models', 'scripts', etc.
- Ideally, skim through the CLM ChangeLog (https://svn-ccsm-models.cgd.ucar.edu/clm2/trunk/ChangeLog) to get an overview of what changes you will be pulling in, so that you can identify possible conflicts with your code.
Also, while not essential, it is helpful for the sake of our tag naming convention to confirm that you don't have any untagged changes on your branch. If you do, create a new branch tag before performing this step. This can be checked by examining the output from:
svn log --stop-on-copy https://svn-ccsm-models.cgd.ucar.edu/clm2/branches/<branchname>

svn log -v --stop-on-copy https://svn-ccsm-models.cgd.ucar.edu/clm2/branch_tags/<branchname>_tags
Alternative method
The above check can be done much more easily with our wrapper scripts
Some general information on merging is at: http://svnbook.red-bean.com/en/1.7/svn.branchmerge.html
We have found it safest to provide the starting and ending trunk tags for a merge, rather than relying on svn's merge tracking. This tells subversion, effectively, "merge all of the changes that have been made since the starting trunk tag, up through and including the ending trunk tag." Our tag naming convention facilitates this.
The general command is:
svn merge https://svn-ccsm-models.cgd.ucar.edu/clm2/trunk_tags/<CURRENT_clm_baseline_tag> https://svn-ccsm-models.cgd.ucar.edu/clm2/trunk_tags/<NEW_clm_baseline_tag>
For example, if your latest branch tag is:
branchname_n09_clm4_5_36
(so you are up to date with clm4_5_36), and you want to update to clm4_5_38, you would do the following:
# EXAMPLE
svn merge https://svn-ccsm-models.cgd.ucar.edu/clm2/trunk_tags/clm4_5_36 https://svn-ccsm-models.cgd.ucar.edu/clm2/trunk_tags/clm4_5_38
Subversion may inform you about merge conflicts. This can occur when the same block of code has been modified on both your branch and the trunk. In this case, subversion needs your help deciding what the new, merged code should look like.
You can resolve conflicts as you go, or resolve them later - see http://svnbook.red-bean.com/en/1.7/svn.tour.cycle.html#svn.tour.cycle.resolve for details. Resolving conflicts can sometimes be tricky. If you can't figure out how to resolve a certain conflict, you may ask the CLM Code Management Team for help.
After resolving conflicts, you need to update your sandbox; this is needed in order to update any external components (cime, etc.) that have been updated on the trunk:
svn update
(Note that this is a special use of 'svn update'; this command has a more general use that is very common when multiple people are collaborating on a branch - see http://svnbook.red-bean.com/en/1.7/svn.tour.cycle.html#svn.tour.cycle.update for details.)
An svn merge just updates your sandbox. You then need to commit these updates back to your branch with:
svn commit -m "update to <NEW_clm_baseline_tag>"
Note again that the above commands need to be done from the top-level directory of your CLM sandbox (containing models, scripts, etc.).
Finally, create a new branch tag. Now the branch tag number will stay the same (n09 in the above example), because you haven't made any changes to your branch, but you will update the baseline tag number (so, in the above example, your new branch tag name would be branchname_n09_clm4_5_38):
svn cp https://svn-ccsm-models.cgd.ucar.edu/clm2/branches/<branchname> https://svn-ccsm-models.cgd.ucar.edu/clm2/branch_tags/<branchname>_tags/<branchname>_n<XX>_<NEW_clm_baseline_tag> -m "update to <new baseline tag>"
Following the above example, with a branch named fix_lots_of_bugs, this would be done as:
# EXAMPLE
svn cp https://svn-ccsm-models.cgd.ucar.edu/clm2/branches/fix_lots_of_bugs https://svn-ccsm-models.cgd.ucar.edu/clm2/branch_tags/fix_lots_of_bugs_tags/fix_lots_of_bugs_n09_clm4_5_38 -m "update to clm4_5_38"
Alternative method
Our wrapper scripts make this last command simpler and less error-prone - see the description of the alternate method for details.
Post-merge testing
As noted above, subversion will tell you when there is a merge conflict with a particular block of code. However, subversion CANNOT detect logical conflicts. For example, perhaps you have added a line of code that uses an existing local variable, but that variable was deleted on the trunk; this would lead to a build error. Or, more subtly, perhaps you have modified a variable whose meaning has changed on the trunk; this sort of conflict could only be detected through testing.
Because of the possibility for these conflicts, we recommend running at least one test of your new code after a merge, to make sure it still builds properly, and ideally to make sure that your modifications still give the same results as before.
Step 7. Repeat until finished
Repeat steps 4-6 as needed.
Alternative method: Use wrapper scripts to facilitate making branches and tags
Do some one-time setup for a given machine
First, check out the scripts that you'll use for the following steps. This just needs to be done once on a given machine. (Note: on NCAR's yellowstone system, these tools already exist in $CESMDATAROOT/tools/svn_scripts, so you can skip the svn co, and replace ${HOME}/svn_scripts with that path in the following setenv command.)
svn co https://svn-ccsm-models.cgd.ucar.edu/tools/svn_scripts/trunk/ ~/svn_scripts
You may want to read through the README file in that directory for details on the scripts contained there. Also, run any of these commands with the '-h' option for a help message.
Include the above directory in your path. The method for doing this depends on your shell. (You can determine your shell by typing "echo $SHELL" at the command-line prompt.)
For csh / tcsh you should type the following; you need to do this each time you log in. Or, for more convenience, put this line in the file ~/.cshrc so that it is done automatically for you when you log in:
setenv PATH ${PATH}:${HOME}/svn_scripts
For bash you should type the following; you need to do this each time you log in. Or, for more convenience, put this line in the file ~/.bashrc so that it is done automatically for you when you log in:
export PATH=${PATH}:${HOME}/svn_scripts
Alt method - Step 1. Create your branch and branch tag areas
First determine a baseline tag and branch name, as described under Step 1, above.
You can determine the latest trunk tag with:
svn-latest_tag -u https://svn-ccsm-models.cgd.ucar.edu/clm2/trunk
You can then create your branch and branch tag areas with the following command:
svn-make_cesm_branch -u https://svn-ccsm-models.cgd.ucar.edu/clm2/trunk_tags/<clm_baseline_tag> <branchname> "<message describing the purpose of your branch>"
Alt method - Steps 2 - 4
These are the same as described above.
Alt method - Step 5. Tag changes
If you are in a directory with the checkout of your branch (even if you are in a subdirectory of this checkout), you can do the following:
Determine the latest tag on your branch, and/or the changes that have been made since the last branch tag:
svn-latest_tag
svn-changes_since_last_tag
A typical branch tag name will look like:
branchname_n08_clm4_5_36
The n08 in this name indicates that this is the 8th set of changes that have been tagged, and clm4_5_36 indicates that the branch is up to date with the clm4_5_36 trunk tag.
In the above example, you would name your new branch tag:
branchname_n09_clm4_5_36
svn-make_cesm_tag -m "<description of the changes in this tag>" <branchname>_n<XX>_<clm_baseline_tag>
This will show you changes that have been made since the last branch tag, and ask for your confirmation. Note that you do NOT need the full URL in the above command - this is determined automatically.
As with the svn commit command, you can use the -F option instead of -m to provide a file with a longer commit message.
Typically, a given branch tag will either include changes that you have made (as above), OR update the baseline version (see below), but not both.
Alt method - Step 6. Update your branch to a later trunk version
Most of this step is the same as described above. However:
Before merging in the latest trunk version, it is helpful to make sure you don't have any untagged changes on your branch (this is important for our tag naming convention). You can check this with:
svn-changes_since_last_tag
and if you find there have been changes since the last branch tag, you can tag them using svn-make_cesm_tag (as described above).
Follow the Step 6 instructions given above (the merge, update and commit commands) until you get to the stage of creating a new tag. This can now be done with the following (recall that you will keep the XX tag number the same as in your last branch tag, since you have only changed the baseline tag, and have not made any branch-specific changes):
svn-make_cesm_tag -m "update to <new baseline tag>" <branchname>_n<XX>_<NEW_clm_baseline_tag>